Write your spec
Create a user flow
Let AI map how users move between screens from your PRD and features, then refine it with revisions and direct edits.
A user flow shows, in one picture, the screens, actions, data steps, and decision points a user goes through from entering your product to reaching a goal. Manyfast reads your PRD and features and builds the user flow for you. After that, you can ask AI to change just part of it or edit it yourself on the canvas.
Before you start
If something is missing, the User Flow tab shows Please write PRD and feature specs first. Select Write PRD or Write feature items to go to that tab.
Generate a user flow
- Open the User Flow tab at the top of the editor.
- For your first user flow, select Generate user flow in the middle of the canvas. It starts right away with Whole flow at Standard detail. To choose scope and detail, select New user flow in the navigator (Flows) once you have a flow.
- When Generate new user flow opens, choose how wide the flow should be under Scope.
- Whole flow: connects every PRD feature into one flow.
- Core journey: draws the most important journey from start to finish.
- One role: draws only the screens one role uses. Type the role in the box next to it.
- Under Detail, choose how much to include.
- Brief: links screens only, so it reads at a glance.
- Standard: draws screens and the main branches.
- Detailed: adds branch conditions, where data is saved, and what happens on failure, so you can hand it straight to developers.
- If there's a flow you don't want missed, add it under Extra request. For example: "Include retrying a failed payment."
- Check your choices in the You'll get line, then select Generate user flow.
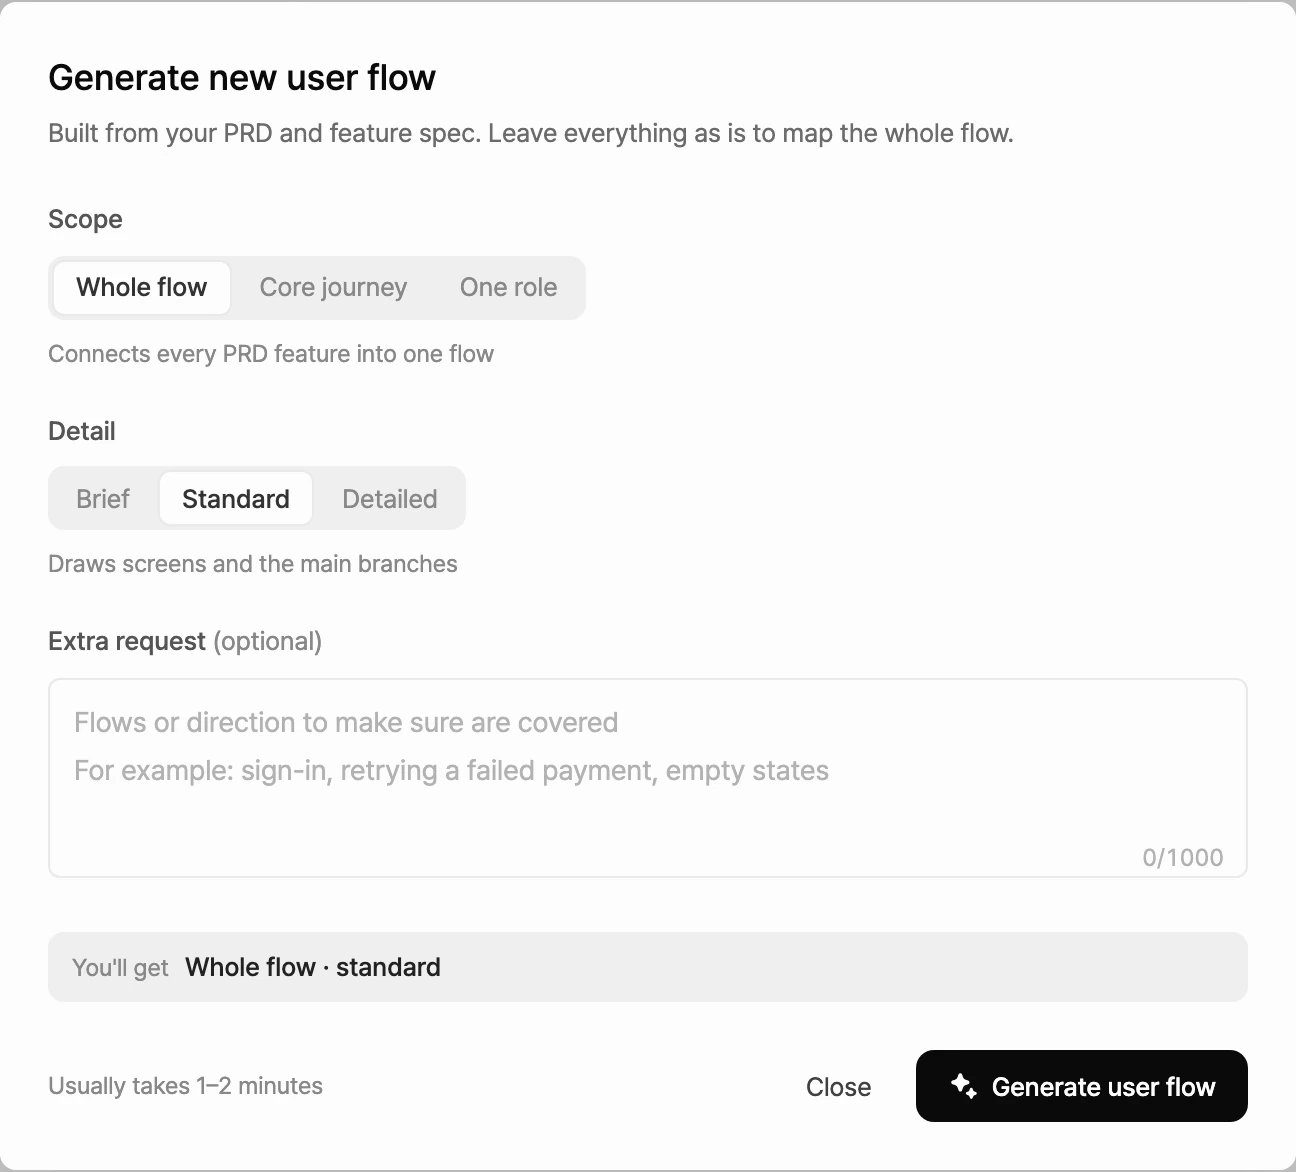
If you leave everything as is, you get Whole flow at Standard detail. Generation usually takes a minute or two. While it runs, the canvas shows the current step, and you can select Stop to cancel.
Read the flow
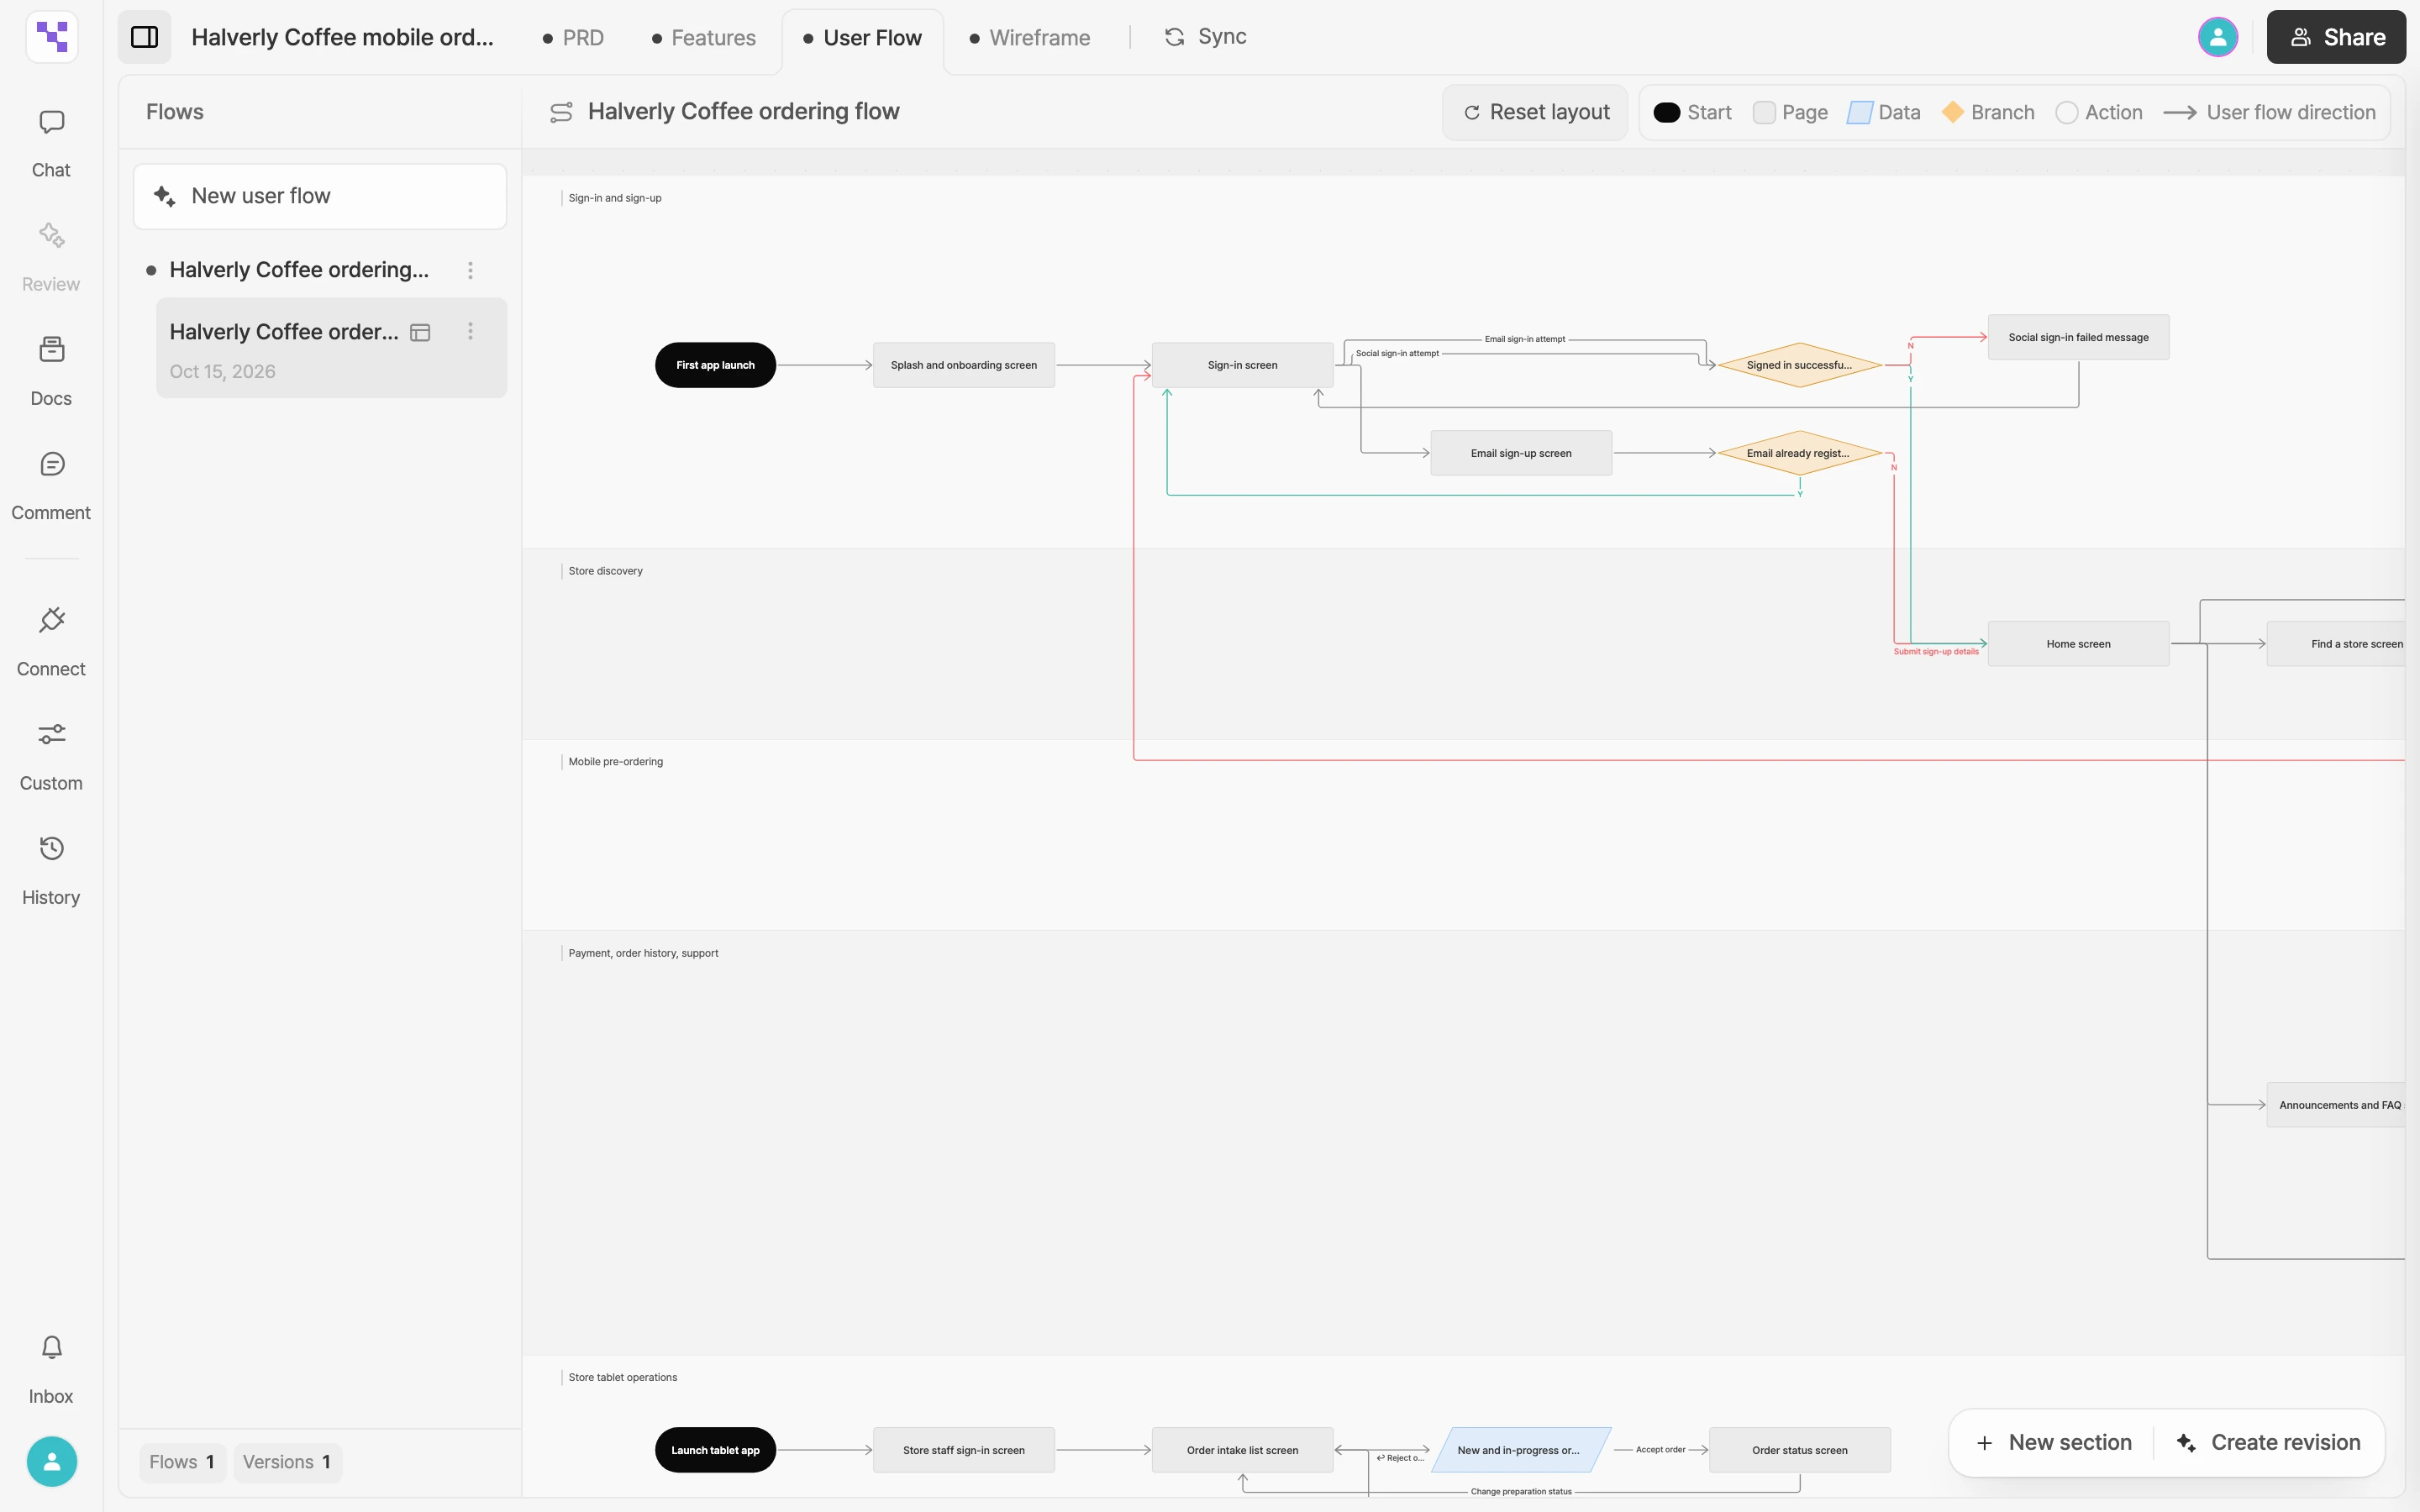
A user flow is made of nodes, connections, and sections. The legend at the top of the canvas shows what each node shape means.
Node types
| Node | What it means |
|---|---|
| Start | Where the flow begins |
| Page | A screen the user sees |
| Data | A step that loads, saves, or changes data. Drawn as a parallelogram. |
| Branch | A point where the path splits on a condition. Drawn as a diamond. |
| Action | Something the user does, like pressing a button or entering information |
Connections and sections
- Connections are arrows that show where the user goes next. Connections leaving a branch carry a condition such as Y or N.
- Sections group the screens that serve one purpose.
Create a revision with AI
Use a revision when you want to change part of a flow without starting over.
- With the flow open, select Create revision in the toolbar at the bottom right of the canvas. The Create revision panel opens.
- Under How should it change?, describe the change. For example: "Add an email verification step after login."
- To focus on specific parts, select nodes on the canvas to add them under Focus on. Leave it empty and AI finds the right place in the whole flow.
- Select Preview changes. AI lists what it will change as a Change plan.
- Review the plan and choose how to apply it.
- Apply: changes the version you're looking at.
- Create new version: keeps the current version and saves the result as a new version of the same flow.
If the change is too large to apply at once, Manyfast tells you. You can then choose Generate a new flow or Regenerate from this version.
You can also ask for user flow changes in chat. See Chat with AI.
Edit on the canvas
Small changes are faster to make right on the canvas. Your edits save automatically, and Saving... and Saved appear at the top left of the canvas.
- Node tools: select a node to show tools above it. You can change the node type, move it to another section, rename it, or delete it.
- Add nodes: the + on the right of a node adds the next step, and the + below it adds a node at the same step.
- Move nodes: drag a node where you want it.
- Connect nodes: drag from a node's connection point to another node.
- Edit connections: select a connection to name the action with Add transition label. On a connection leaving a branch, set the Branch condition to Y (yes), N (no), or Custom. You can also delete the connection.
- Add a section: select New section in the toolbar at the bottom right of the canvas.
- Reset layout: to drop your manual placement and line everything up again, select Reset layout at the top of the canvas.
Manage flows and versions
The navigator's Flows list groups your flows, and the versions you create as revisions stack up inside each group. Select a version to open it on the canvas.
- Version menu: Create wireframe (or View wireframe if one exists), Rename, Delete
- Flow group menu: Rename, Delete group
- You can also rename the open flow by selecting its name at the top of the canvas.
Export
In the project menu at the top left, select Export > Export user flow to download it as Image (.png) or Mermaid (.md). See Export for details.