Files and sources
Upload project files
Add reference files to a project so AI can read them and use them as evidence in chat and drafts.
Upload the files behind your plan, such as market research, existing specs, or competitor analysis, as project files. When AI answers in chat or drafts your spec, it reads these files and uses them as evidence. Each project keeps its own set of files.
Supported files
- Formats: PDF, Excel (xlsx), Word (docx), PowerPoint (pptx), Text (txt), Markdown (md)
- Size: up to 50MB per file
- Length: up to 500 pages per file. Split longer files before you upload them.
Upload a file
- In the project editor, select Docs on the left rail to open the Docs panel.
- Select the Files tab.
- Select Upload and choose a file.
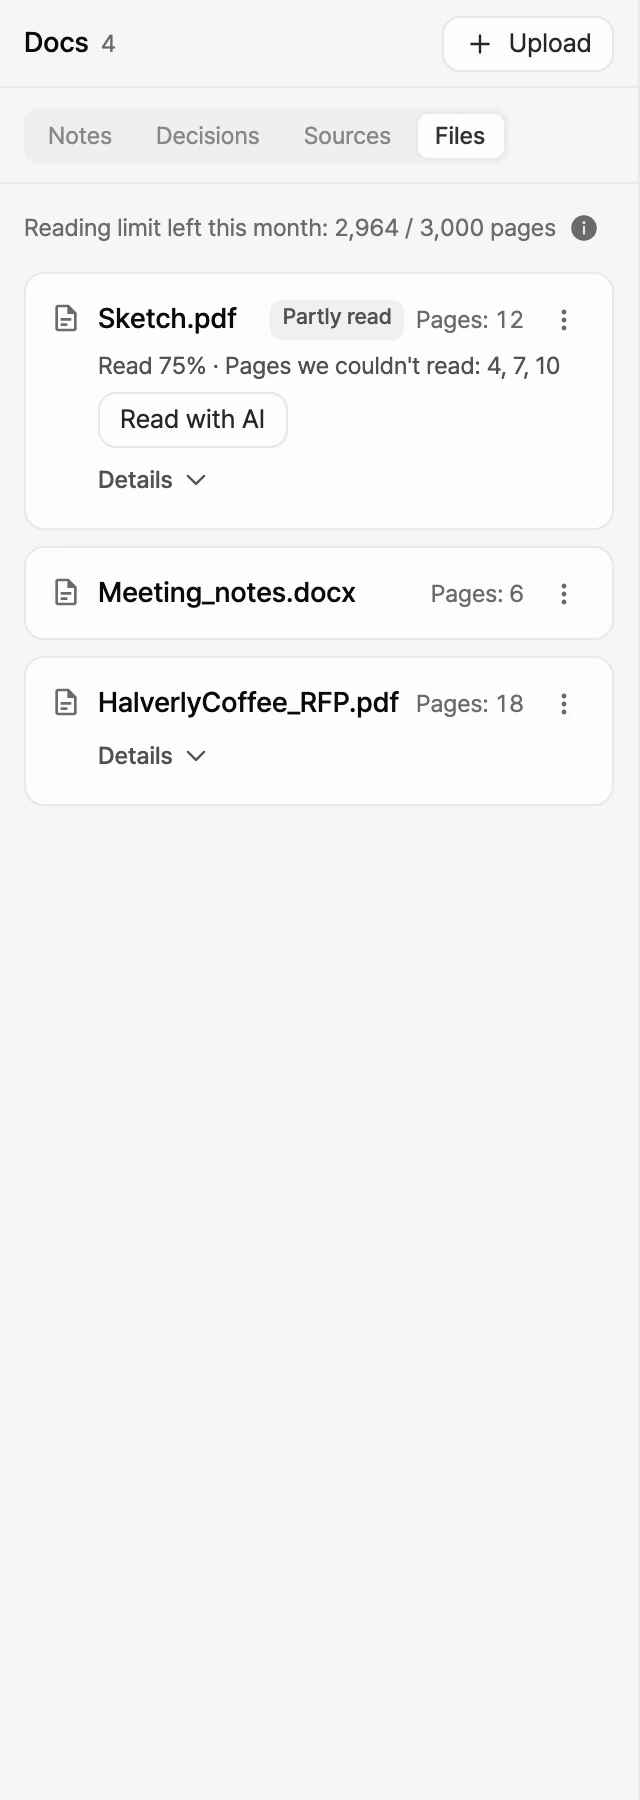
- The card shows Reading while the file is processed, then shows the result.
Files you attach in chat are added to project files too. See Choose files for chat.
Reading status and read rate
Each card shows the file name and page count (slide count for PowerPoint). A fully read file has no status label. A label appears only when something needs your attention.
- Reading: the file is being read.
- Partly read: some parts couldn't be read. The card shows the read rate and which parts were skipped (page numbers for a PDF).
- Failed: the file couldn't be read. The card explains why and what to try.
- Waiting for upload: the upload hasn't finished yet.
Select the file name to open it. For a PDF, switch between Original and Read text (the text pulled from the file), or select Open in new tab to view the original in a new tab. Other formats open as read text, and you can get the original file with Download original. If a file has a table of contents, select Details on its card to expand it, then select an entry to jump to that spot.
Read with AI
Pages that are images, such as a scanned PDF, can't be read as text, so the read rate stays low. If a card shows Read with AI, AI can look at those page images and read them. This uses credits.
- On the file card, select Read with AI.
- In the AI reading quote dialog, check the number of pages, the maximum credits per page, and the maximum total. Viewing a quote is free.
- Select Start AI reading.
- When reading is done, the read rate on the card updates.
Reading limit
Reading your files as text doesn't use credits. Instead, each group has a reading limit in pages, and every file you read uses as many pages as it has.
- How pages are counted: 1 page = a PDF page, about 2,000 characters of Word or text, 200 Excel rows, or 1 slide.
- On plans with a limit, the file list shows Reading limit left (or Reading limit left this month on plans that refill monthly). Select the i button next to it to see whether your limit refills.
- A file with no readable text, such as an image-only scanned PDF, doesn't use your reading limit. You can read it with Read with AI instead.
- When the limit runs out, you can't upload new files. A file with more pages than your remaining limit still uploads, but it can't be read and its card shows Failed. Files you already uploaded are kept.
- When storage is almost full, a notice appears above the list. Delete files you don't use to free up space.
To compare reading limits and storage by plan, see Compare plans.
Check before you create a draft
When you generate your spec in one go, for example with Generate all, and a file has a read rate below 80%, the Some files were only partly read dialog appears first.
- See AI reading quote: stops the draft and opens the AI reading quote for that file. This appears only when AI can read more of it.
- Continue anyway: creates the draft from what was read so far.
- Cancel: doesn't create the draft.
A file with no pages read isn't used in the draft, and the dialog says so.
Choose files for chat
By default, chat uses every file that has been read. To focus on specific files, pick them yourself.
- Select the paper clip button (Files and materials) at the bottom left of the chat box.
- Under Project files, turn on the switch for each file you want to use.
- The files you pick appear as chips above the chat box. They stay in that chat until you remove them with the X on the chip.
- You can also type
@in the chat box and pick from the Files section. - Files that are still being read, or couldn't be read, can't be picked.
- If you attach a supported file with Upload a file in the clip menu, it's added to project files and your message is sent once reading is done.
- Select Manage files to open the file list inside chat, where you can upload or delete files.
Delete a file
- Select the menu button on the right of the file card, then select Delete.
- In the Delete this file? dialog, review what you'll lose and select Delete.
Next steps
- Chat with AI: keep planning with AI using your files.
- Keep sources in Sources: collect meeting notes and memos where the whole group can see them.
- Credits: see what AI reading costs.
- Plans: compare reading limits and storage by plan.