Write your spec
Write your PRD
Fill in the five PRD sections yourself or with chat, and shape the PRD form to fit your team.
A PRD (product requirements document) defines what you're building, who it's for, and why. You write it on the PRD tab in the editor (Shift+1). The goals and user roles in your PRD are what Features builds on, including who uses each feature.
What's in a PRD
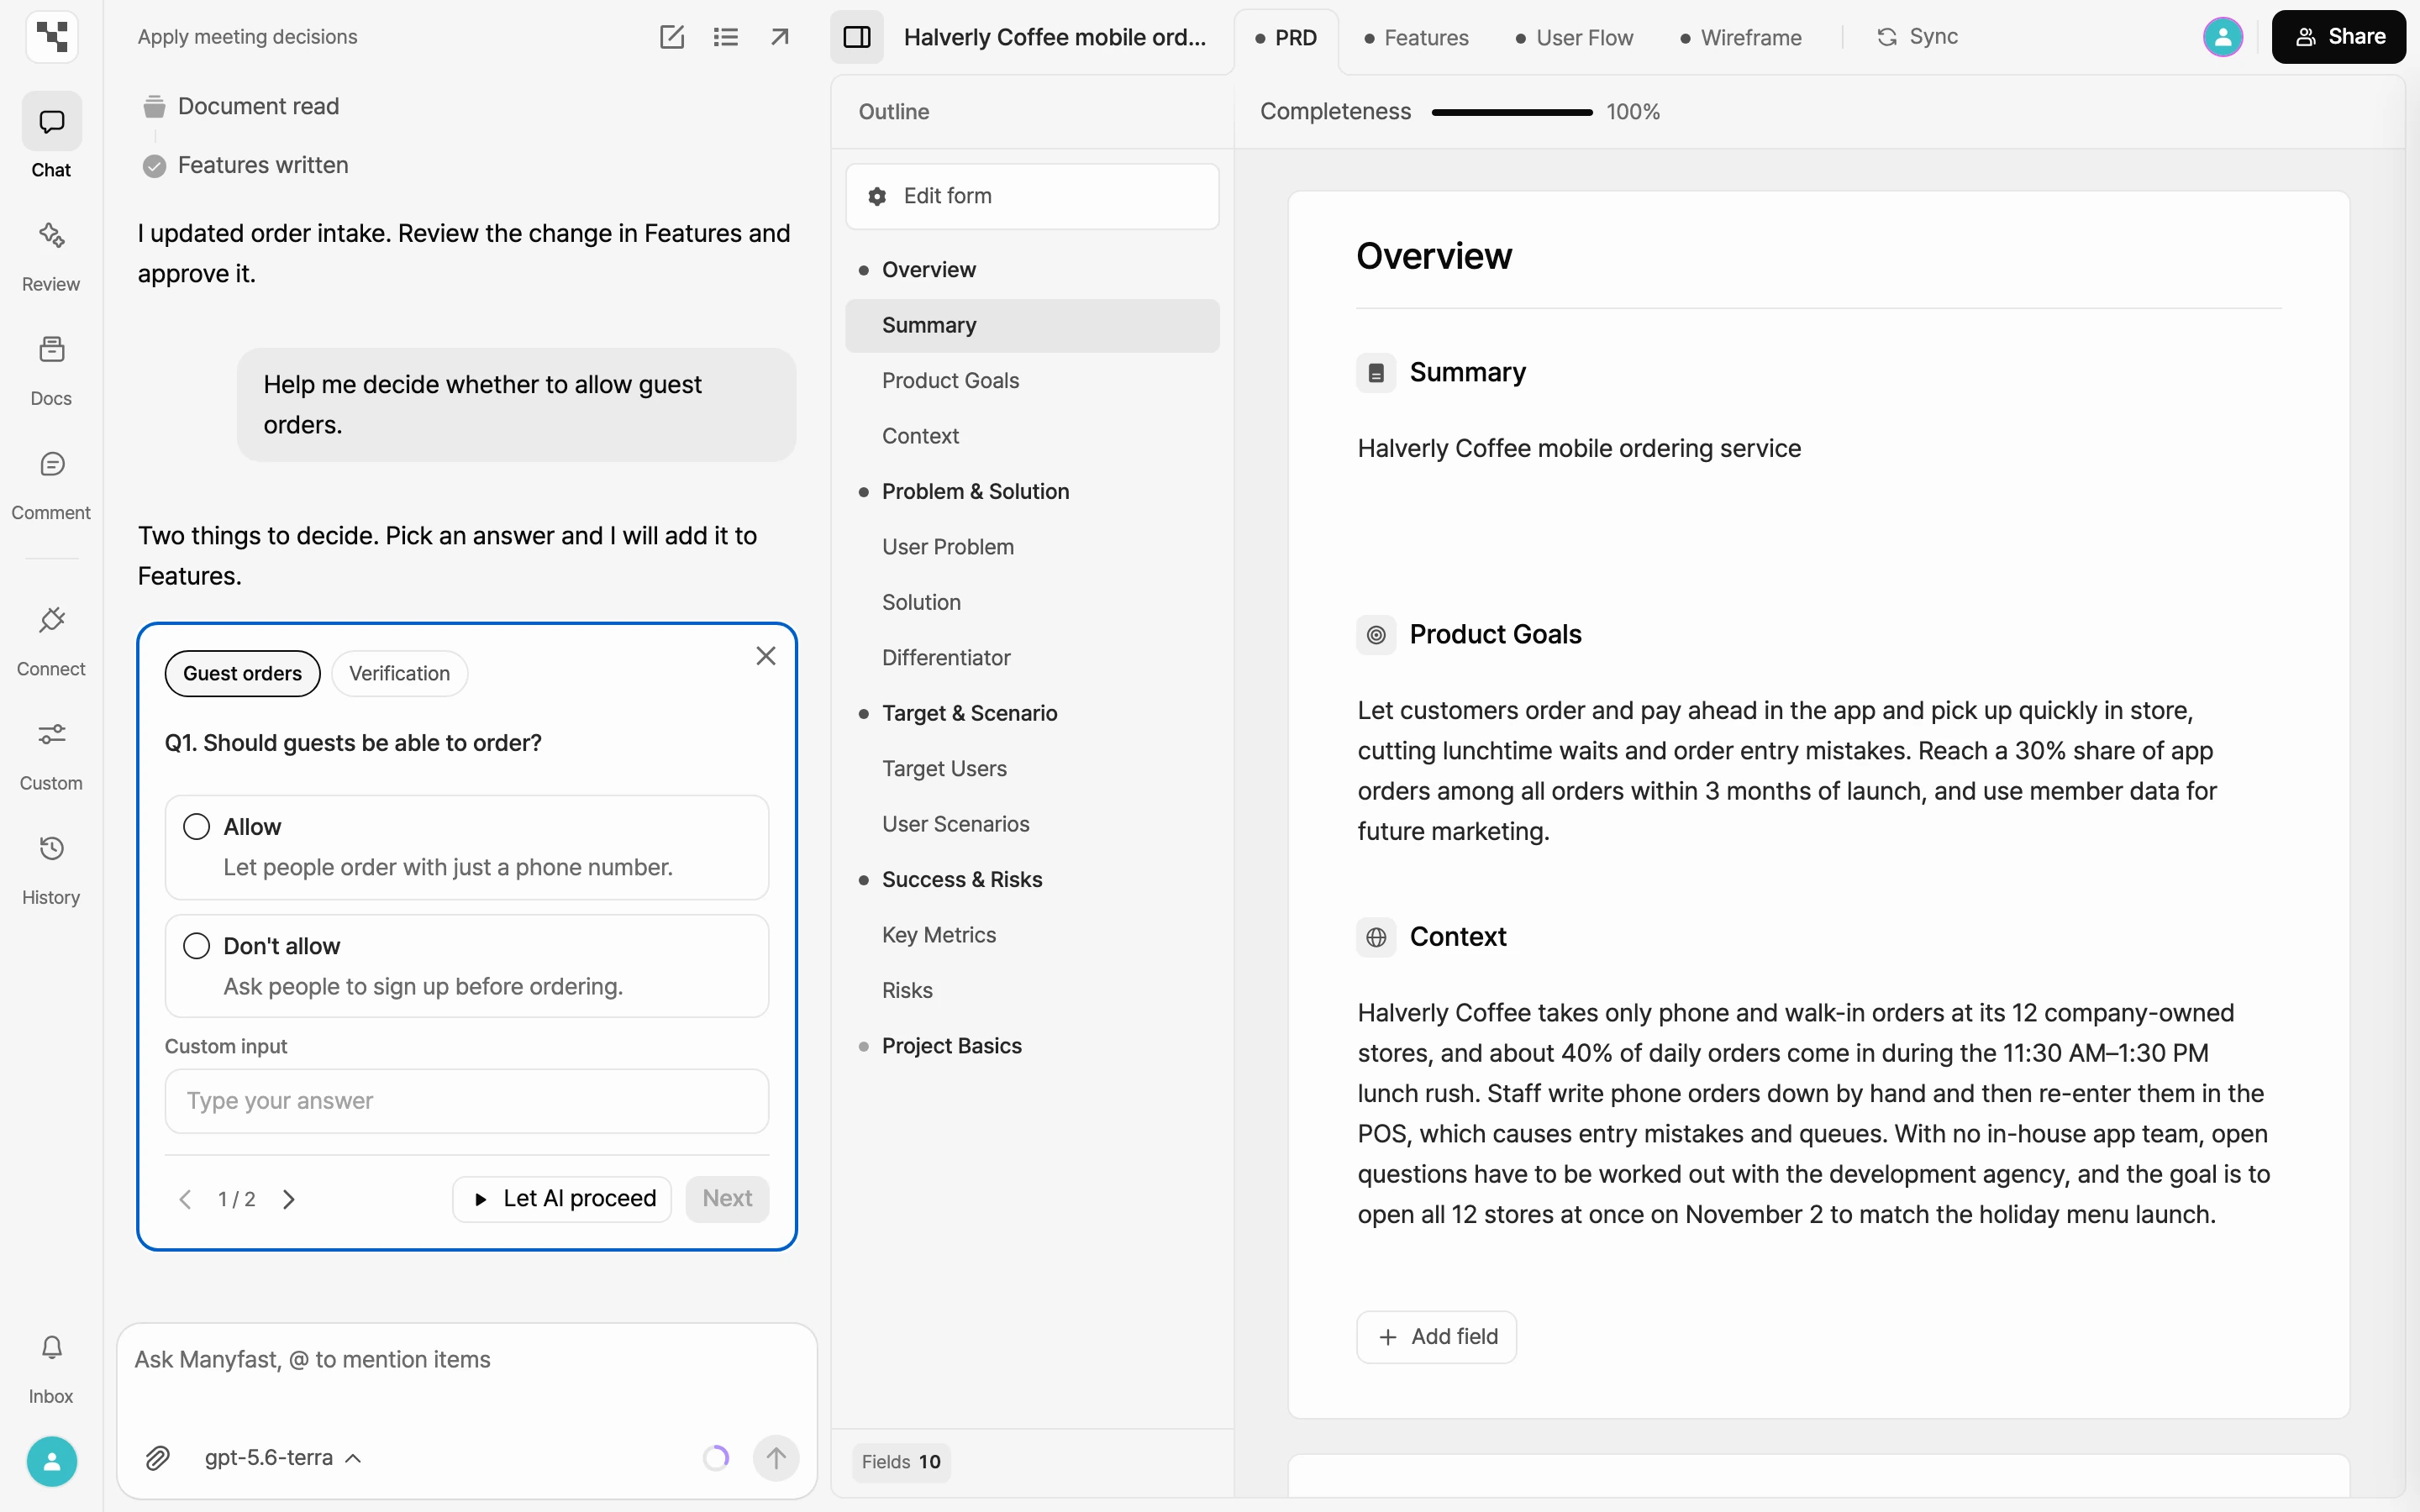
A PRD has five sections. Here are the fields in the default form.
| Section | Default fields |
|---|---|
| Overview | Summary, Product Goals, Context |
| Problem & Solution | User Problem, Solution, Differentiator |
| Target & Scenario | Target Users, User Scenarios |
| Success & Risks | Key Metrics, Risks |
| Project Basics | Category, User Roles, Devices |
- The top row of the body shows Completeness as a bar and a percentage. It tells you how much of the current form you've filled in.
- The Outline in the navigator on the left lists the sections and fields. Click one to jump to it.
- User Roles are linked to features in Features, so you can say who uses each feature.
Write it yourself
- Open the PRD tab.
- Click the body of any field and start typing. Empty fields show a faded example of what to write.
- Click anywhere else and your changes save automatically.
- Select text to bring up the formatting toolbar.
- On an empty line, press
/to add blocks like tables, lists, and checklists.
Fill in Project Basics
Project Basics sets your product's category and target environment.
- Category: Pick one from the list.
- User Roles and Devices: Select Add, type a name, then press
Enteror select Add again. Add each role one at a time.
Write it with chat
- Open Chat on the rail.
- Describe what you want in plain words, like "Split the target users into students and office workers." Type
@to pick an item from your spec and add it to the conversation. - What the AI writes into a blank PRD the first time is saved right away. Its edits to existing content arrive as suggestions on each section, waiting for your approval. Review them and select Approve or Reject on each section, or handle them all at once from the review bar at the bottom of the screen.
To learn how to handle suggestions, see Approve or reject AI suggestions. For more on chat, see Plan with chat.
Edit the PRD form
The PRD form decides which fields each section has. Pick a form that fits your purpose, or add fields and change their order and names to fit your team. Changing the form doesn't change anything you've already written.
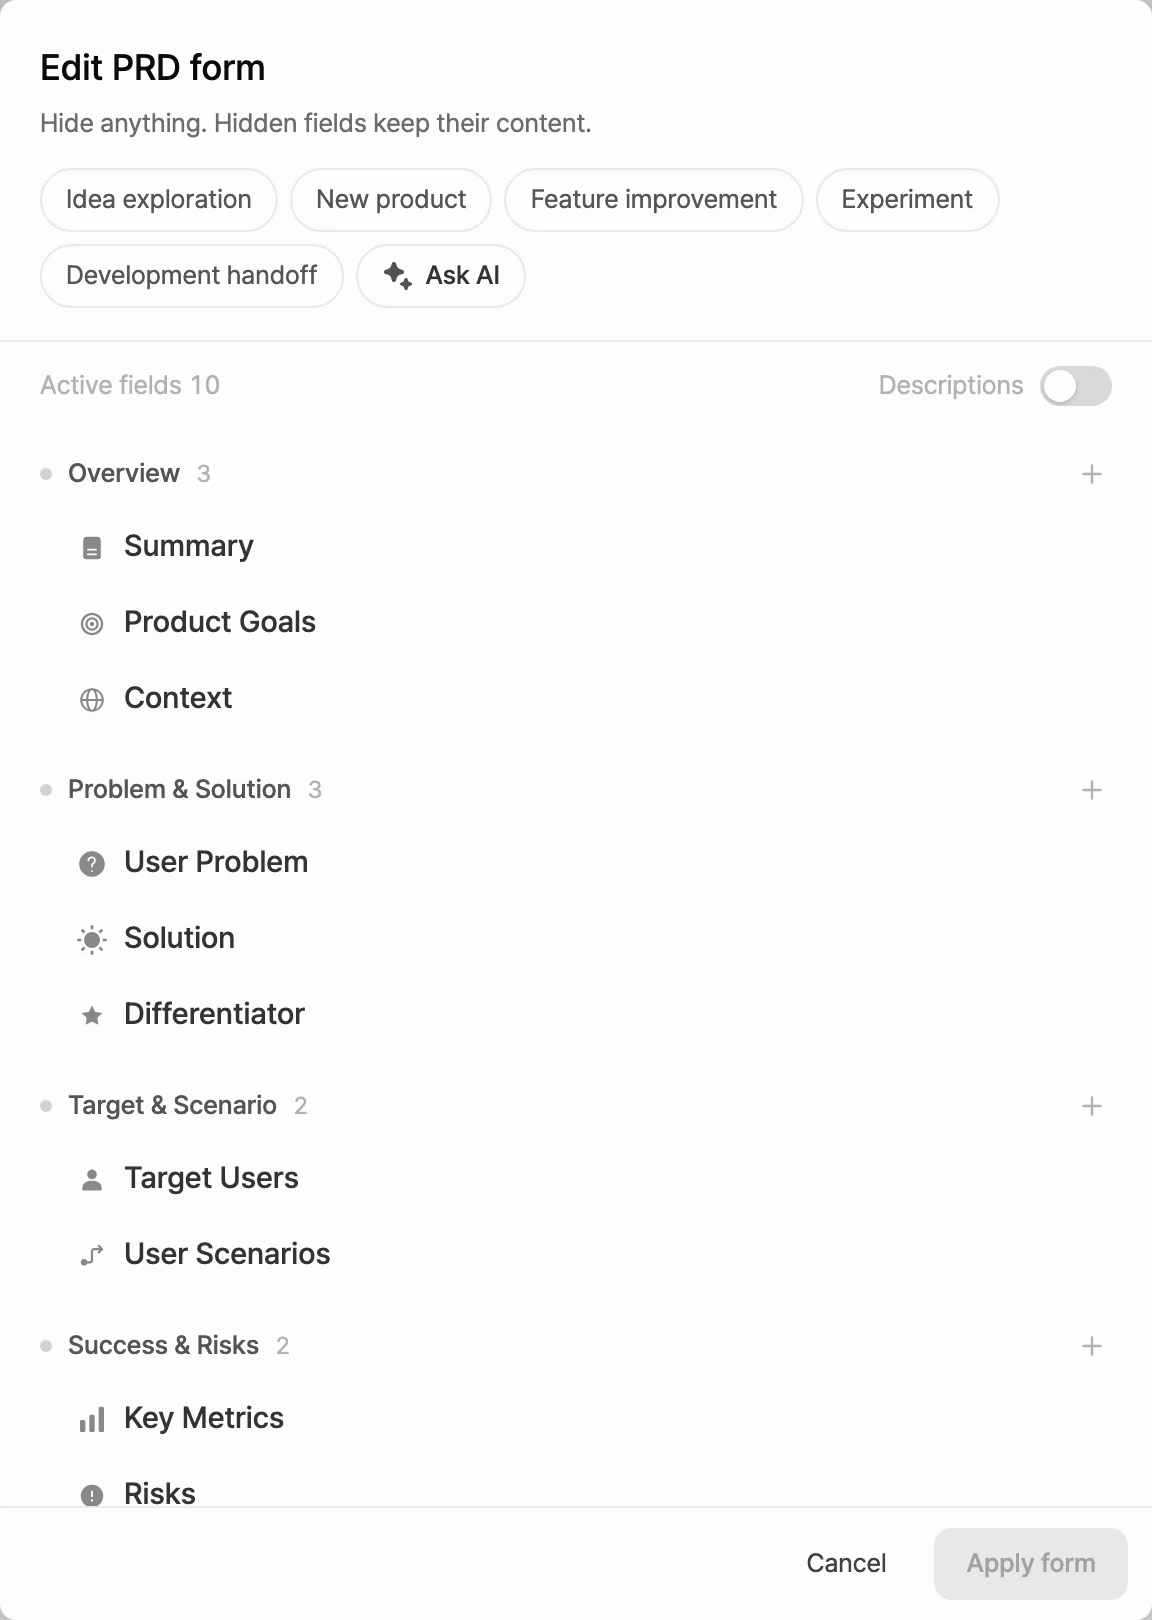
- In the Outline on the left, select Edit form. If the navigator is closed, you'll find it on the right of the top row of the body.
- At the top of the Edit PRD form window, choose a form to start from.
- Select Idea exploration, New product, Feature improvement, Experiment, or Development handoff. Hover over a chip to see what the form is for and how many fields it has.
- Not sure? Select Ask AI, describe the Purpose of this PRD, and select Recommend. AI picks a form that fits.
- Fine-tune the fields under Active fields.
- Select the + to the right of a section name to see suggested fields for that section, each with a description. Pick one, or select Create your own to make a new field.
- Drag fields to reorder them.
- Select a field's edit button to change its Field name. For fields you create, you can also set a Description and an Icon.
- Hide fields you don't need. Hidden fields move to Hidden fields, and anything written in them is kept. To use one again, restore it from Hidden fields.
- Select Apply form.
- The form covers every section except Project Basics.
- Built-in fields keep their original meaning even if you rename them.
- Each section can have up to 20 fields.
- Once you've changed the form, Form edited appears in the top row of the PRD body.
Guide the AI with field descriptions
The Description you write for a field you created is what AI follows when it writes that field. It also appears under the field title in the PRD body, so your teammates know what the field is for.
For example, if you use Create your own to add a "Competitors" field and describe it as "Compare us with three similar services in a table," AI uses that description as its guide when it fills the field.
Change fields in the PRD body
On paid plans, you can also change fields right in the PRD body.
- Add field: Select Add field at the bottom of a section, type a name, then press
Enteror select Add. - Rename: Hover over a field title and select the pencil button.
- Delete field: Select More next to the field title, then choose Delete field.
Reset to the default form
If you've changed the form, Reset to default form appears at the bottom left of the Edit PRD form window. Select it, then select Reset to confirm, and the form goes back to how it started.